Getting Started
1. Build Tasmota with TinyC
Add the following to your user_config_override.h:
#define USE_TINYC         // Enable TinyC VM (XDRV_124)
#define USE_TINYC_IDE     // Self-hosted browser IDE (requires USE_UFILESYS)
USE_TINYC_IDE adds the /tinyc_ide.html endpoint. It requires a filesystem-enabled
build (USE_UFILESYS).
Or grab a pre-built binary from the Releases page and flash it directly.
2. Upload the IDE
- Download
tinyc_ide.html.gzfrom the testing release. - In Tasmota, open Consoles → Manage File System (or POST to
http://<device>/ufsu). - Upload
tinyc_ide.html.gzto the root of the filesystem. - Open
http://<device-ip>/tinyc_ide.htmlin your browser.
The TinyC driver adds its own console page to the Tasmota web UI — one row per VM slot, program upload, bytecode repository, and a shortcut to open the IDE:
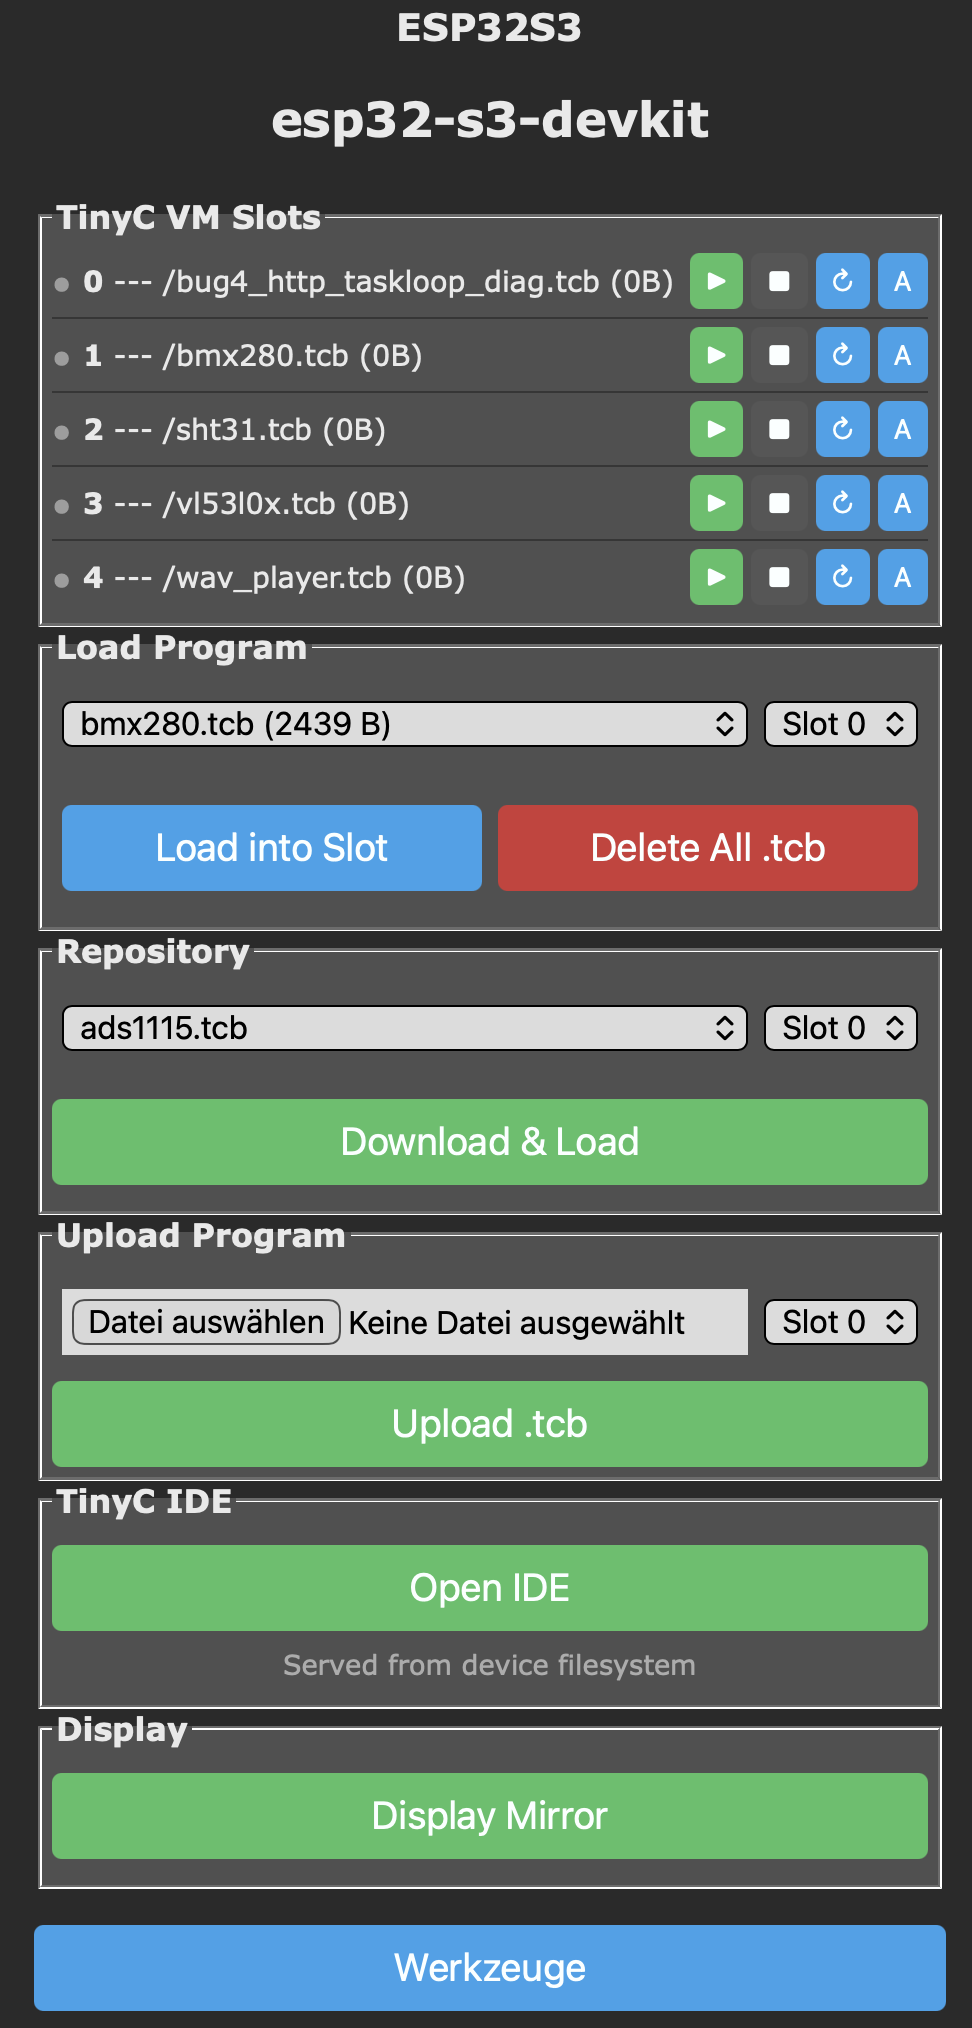
Elements on the device console
TinyC VM Slots — up to six independent VM instances (0–5). Each row shows
the currently loaded .tcb file and its size, followed by four action buttons:
| Button | Action |
|---|---|
| green | Start / resume the program in this slot |
| dark | Stop execution and free heap memory |
| blue | Reload the same .tcb from flash and restart |
| A blue | Toggle autoexec — this slot runs on every boot |
Load Program — pick an existing .tcb already on the device filesystem and
load it into the chosen slot. Delete All .tcb wipes every compiled bytecode
from flash (not the source .tc files on your PC).
Repository — online bytecode library. The dropdown lists pre-compiled examples; Download & Load pulls the file to the device and loads it into the selected slot in one step.
Upload Program — push a locally compiled .tcb straight to a slot. Useful
during development when you're iterating on a program outside the IDE.
TinyC IDE — opens /tinyc_ide.html in a new tab (served straight from the
device filesystem; no cloud, no external host).
Display Mirror — opens a live browser view of the attached display for devices with a connected TFT/OLED/e-paper panel.
Werkzeuge / Tools — returns to the standard Tasmota Tools menu.
3. Your first program
void main() {
    addLog("Hello from TinyC!");
}

void EverySecond() {
    float t = temperature();
    char buf[64];
    sprintf(buf, "temp=%.1f C", t);
    addLog(buf);
}
- Ctrl+Enter compiles.
- Ctrl+Shift+Enter uploads + runs.
- Stop button halts execution.
Console output appears in the Tasmota Console tab.
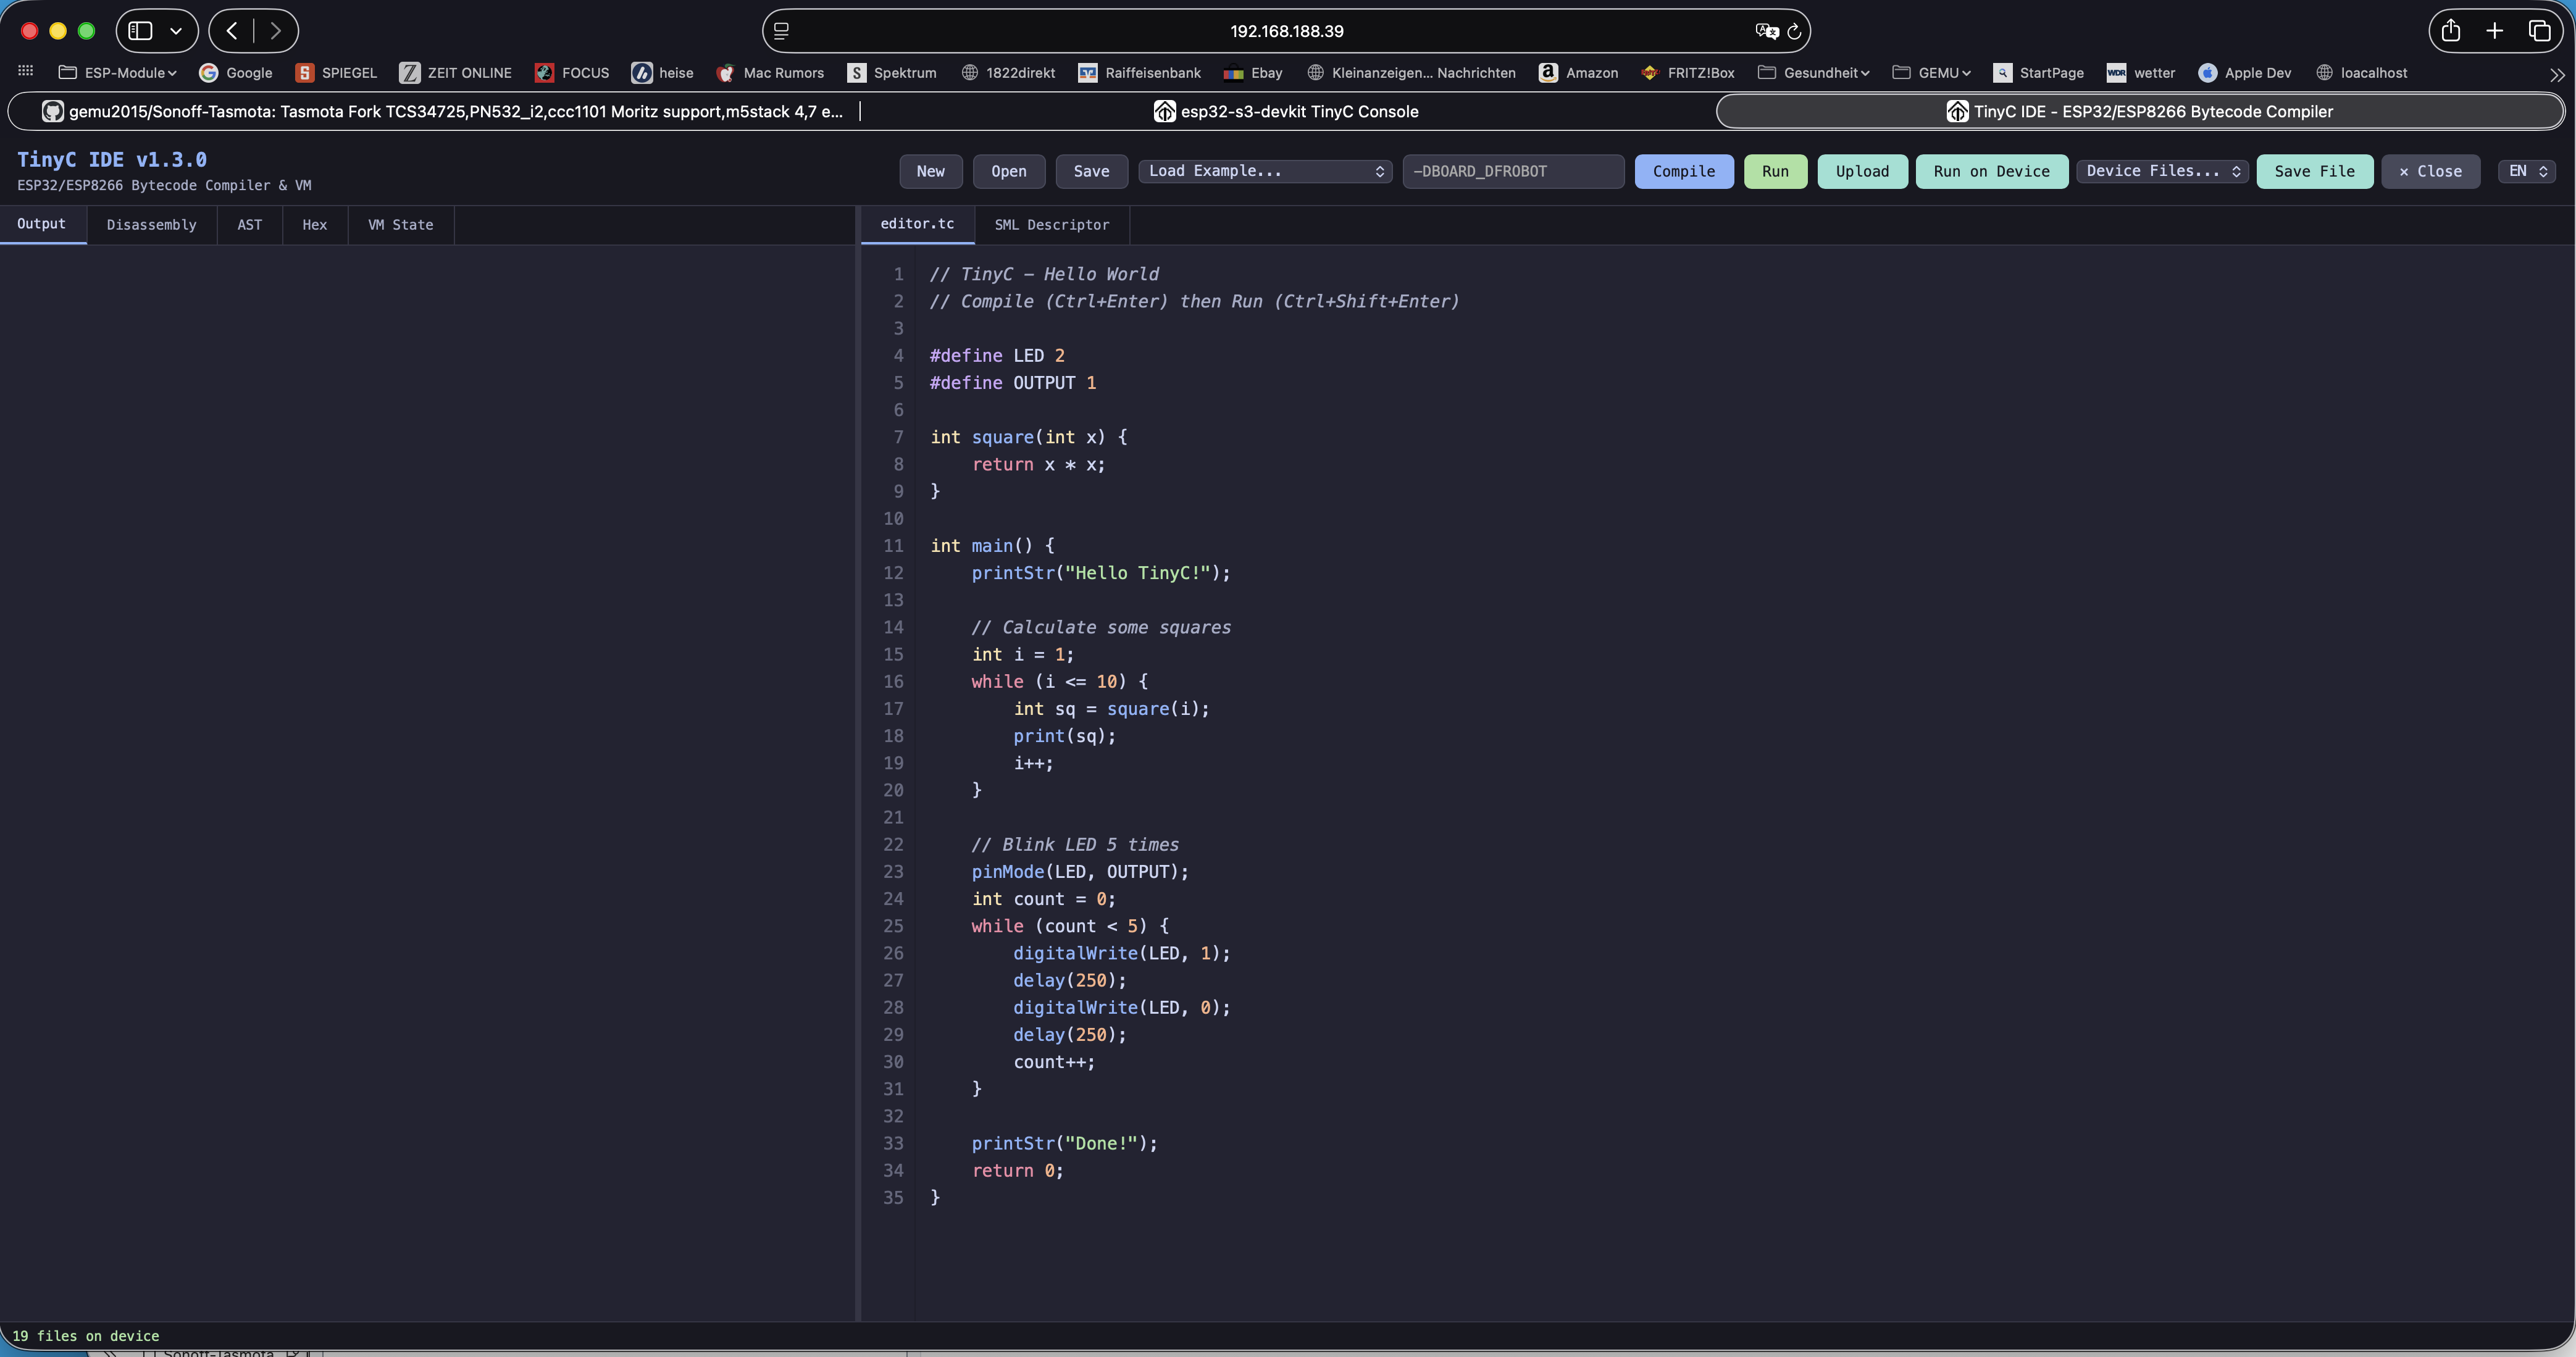
Elements in the browser IDE
Top toolbar (left to right):
| Button | Purpose |
|---|---|
| New | Empty editor + fresh filename |
| Open | Load a .tc source file from your PC |
| Save | Save the current source to your PC |
| Load Example… | Pick from the 51 bundled programs (sensors, displays, charts, Matter, BLE, networking) |
| Repo Examples… | Browse the larger online example repository (~150 programs) and load one without leaving the IDE |
| Incl | Pull in a folder of .tc / .h / .c files as #include sources for the current program |
| Compile | Parse + generate bytecode (output on the left pane) |
| Save .tcb | Download the compiled bytecode (.tcb) to your PC |
| Run | Execute the compiled bytecode in the in-browser VM (no device needed) |
| Slot | Target VM slot (0–5) for the device actions that follow |
| Device IP | Address of the Tasmota device to talk to (auto-filled when the IDE is served from the device) |
| Upload | Send the .tcb to the connected device's filesystem |
| Run on Device | Upload + load into the chosen slot + start, all in one click |
| Device Files… | List / download / delete files on the device filesystem |
| Save File | Save both source and compiled bytecode to the device |
| ✕ Close | Close the current tab |
| EN / DE | UI language toggle |
Left pane tabs — compiler introspection:
- Output — compiler messages, VM stdout, error locations
- Disassembly — human-readable bytecode listing with opcode offsets
- AST — parsed syntax tree (useful when a construct isn't compiling as expected)
- Hex — raw
.tcbbyte dump for inspection or manual upload - VM State — live registers, stack, heap, and globals while a program runs
Right pane tabs — sources:
- editor.tc — the TinyC source you're editing
- SML Descriptor — separate text buffer for smart-meter descriptor lines; sent to the device alongside the program when present
Status bar (bottom) — shows Ready / status messages; once an IP is entered and
the device responds it also reports the device's filesystem file count (updates as you
upload or delete).
4. Where to go next
- Browse the function reference — every syscall with signatures and examples.
- Look at the examples — working code for common sensors, displays, and protocols.
- See the gallery — screenshots of projects on real hardware.